

Social media is an amazing thing. You can learn so much from so many and find inspiration on line with the click of your finger, a little like Witch Craft actually...
Today I wanted to share with you some of these addictive little charity shop rescues that have been occupying my hands and delighting creative side. I follow a lady who goes by Jcath1 on Instagram, her photos are wonderful and she like me is not only a tea enthusiast but a witches tea enthusiast. She posted her photo of her handmade tea witch in August and I commented on how much I loved it and where she found it, I was thrilled when she said she made her own and that they are easy to make, she kindly told me how she made hers and I am sharing now how I make mine, each of us has a different method but we are both thrilled with our results.

After some easy trial and error I can make my little lovelies in minutes, the drying time takes longer but the results are instantaneous and contagious. I bet you can not make just one!
Here is what you need to make your own Upcycled Tea Time Witch Ladies
-a small ceramic statue of a lady or a girl, with or with out a hat on. I got mine at our local charity shops and paid between 50 cents and $3.00 for each of mine do not find the most expensive ones for a make over, just some that look like they need a second chance!
-Black Chalkboard Paint (I got mine at the dollar store)
-Crayola Air Dry Modeling Clay (You can use Polymer Clay as well if you like)
-Paint Brushes
-News Paper/or foil to cover your work space
-Optional tools for clay ( I used scissors on one hat to make it even)

Step 1- Take a look at your figure, does she have a hat you can build onto or does she need an entire hat? If she has a hat like the one in this photo, work some clay between your fingers and simply build her a hat. As I built my hat up I twisted the clay to thin it out and create a textured hat.


Step 2- You are supposed to let them dry for a few days. I am admittedly however, the most impatient crafter on the planet and if I can not have it done in an hour well I lose interest so I will leave it up to you. If you are careful you can make this work too! Open your chalk paint and grab your paint brushes as it is time to start painting the ladies! I start with painting all the delicate areas first around the collars, hands and hair, now I don't have the worlds most steady hand so I make mistakes but it is all okay! Once you have outlined your figure fill in the dress using long and as steady as you can strokes.


Step 3- Let them dry for real this time, and start shopping for more, then repeat! Shown above is my day two find of a tiny little lady whom I made over rather nicely I think!

But you do not have to stick to all black, you can just add a hat or you can do other colors.
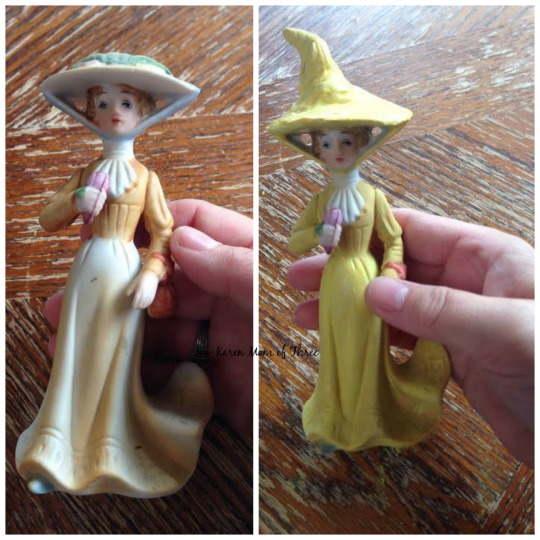
As I make these little figures I have found they take on a character of their own, reminding me of friends so I kept this one yellow as it reminds me of my friend Sheryl from Booth Talks Books, Yellow is her favorite color.


If you are wondering what I do with them when they are done, well I use them in my pictures, admire them on my shelf and maybe just maybe I will make some as gifts.
I hope you have been inspired by and try your own hand at making these fun little witches.
Thank you for joining me for a cup of tea and a tea time craft today. I would love to hear from you so please leave me a comment here or email me at karenmowen@gmail.com
I love them!
ReplyDeleteAwe, I love these way too much! <3 It's like I am actually there in my pretty yellow attire.
ReplyDeleteI love this idea! So unique and looks like SO much fun! Definitely going to try this once I find some "girls" to work on! :)
ReplyDeleteYour craftiness knows no bounds! They are so cute.
ReplyDeleteSo cute. I never would have thought about doing that and it's so simple. Love these little tidbits of great ideas. Thanks.
ReplyDeleteSo cute. I never would have thought about doing that and it's so simple. Love these little tidbits of great ideas. Thanks.
ReplyDeleteVery cool idea!
ReplyDelete