Showing posts with label Tea Craft. Show all posts

Monday, June 22, 2020

A Cup of Tea, An Accident and A Great Centerpiece...

“She is a beautiful piece of broken pottery, put back together by her own hands, and a critical world judges her cracks while missing the beauty of how she made herself whole again.”
-JM Storm 

My tea photo from this morning,  American Beauty is the pattern name, and I bought the mug at a thrift store, brought it home, washed it and then it broke, such a pretty pattern I wanted to do something with it so I decided to make a small center piece planter bowl for my table. This weekend I also found the tray that the scone is on, paying $4.99 for it. I do love how it looks together. 
I thought I would share with you how I made it, on the off chance you might wish to make one too. 
I used stones and the planter tin from Michael's the Craft Store and they were on sale for 60% off, craft foam from the dollar store, along with a succulent (also from the dollar store, my green thumb doesn't work indoors), paper, jute rope and a bit of hot glue. 
I lay the foam down and pressed the broken cup into it. I then pressed the succulent in the cup to see how to arrange it.
I wanted to put the cup towards the bottom of the planter edge, 
I then removed the cup and foam and added just some craft paper, as the plant is fake I wanted to add something on the bottom so I did not use up all the rocks.
 I then put the cup and succulent on the paper and poured the rocks around it. Hiding the craft foam as I went.
My helpful crafting companion...

Lastly I added the jute cord around the planter and glued the bow into place and then on the backside I added another dab of glue to hold the cord in place. 

Thank you for joining me for a cup of tea and a look at my tea time craft today. I would love to hear from you so please leave me a comment here or email me at karenmowen@gmail.com 

Friday, May 8, 2020

Keeper of The Light Lantern, Cup of Tea & Haiku


I have been spending my time at home crafting with my new cricut joy and items I have purchased at the dollar store. I found these $4 lanterns at my local Dollarama and I used permanent black vinyl and added my decal, a Lighthouse. I added the words Keeper of the Light. Which is part of my Haiku, I wrote below. 


Keeper of the light
Strong, and steadfast, unswerving
The Beacons of Hope
by Karen M. Gibson


It was so much fun creating yesterday and having so much fun. Waiting out the Moon was worth it too, I cannot wait to try to paint what I saw in my night sky!
I think it looked like a painting already. So I am going to try to paint it.
Thank you for joining me this Friday for a cup of tea and a Haiku. I would love to hear from you so please leave me a comment here or email me at karenmowen@gmail.com

Saturday, April 18, 2020

Friday Night Card Class Review...

“The capacity to learn is a gift; the ability to learn is a skill; the willingness to learn is a choice. “-Brian Herbert

Last evening I took a class on line with my sister in law who lives on Vancouver Island and a few other ladies. It was a card making class where the instructor sent us the paper and card stock ahead of time and we all assembled them together and stamped our own images. It has been many years since I made a card and I loved it. I used to be pretty good with stamping, but I bought an inexpensive stamp pad for the card class and I wished I had my old stamping up ones. I need to re order because I forgot how much fun these are to make. 
We made one large card (which I messed up) and my glue stick was dried out.  So I had to switch to a glue gun, clearly unprepared for the card making process. 
I think my favorite part is the tiny little embellishment gem stones.  We even made that tiny pizza box to put the small cards in that is in my first photo!
The class was $15 and more than an hour. I could wear my comfy pants, sip my tea and eat two bite brownies (the evidence is on my saucer) and laugh with some crafty ladies with out leaving the house. 
Anyone else taking or offering classes during this crazy time?
I would love to hear from you so please leave me a comment here or email me at karenmowen@gmail.com 

Wednesday, April 17, 2019

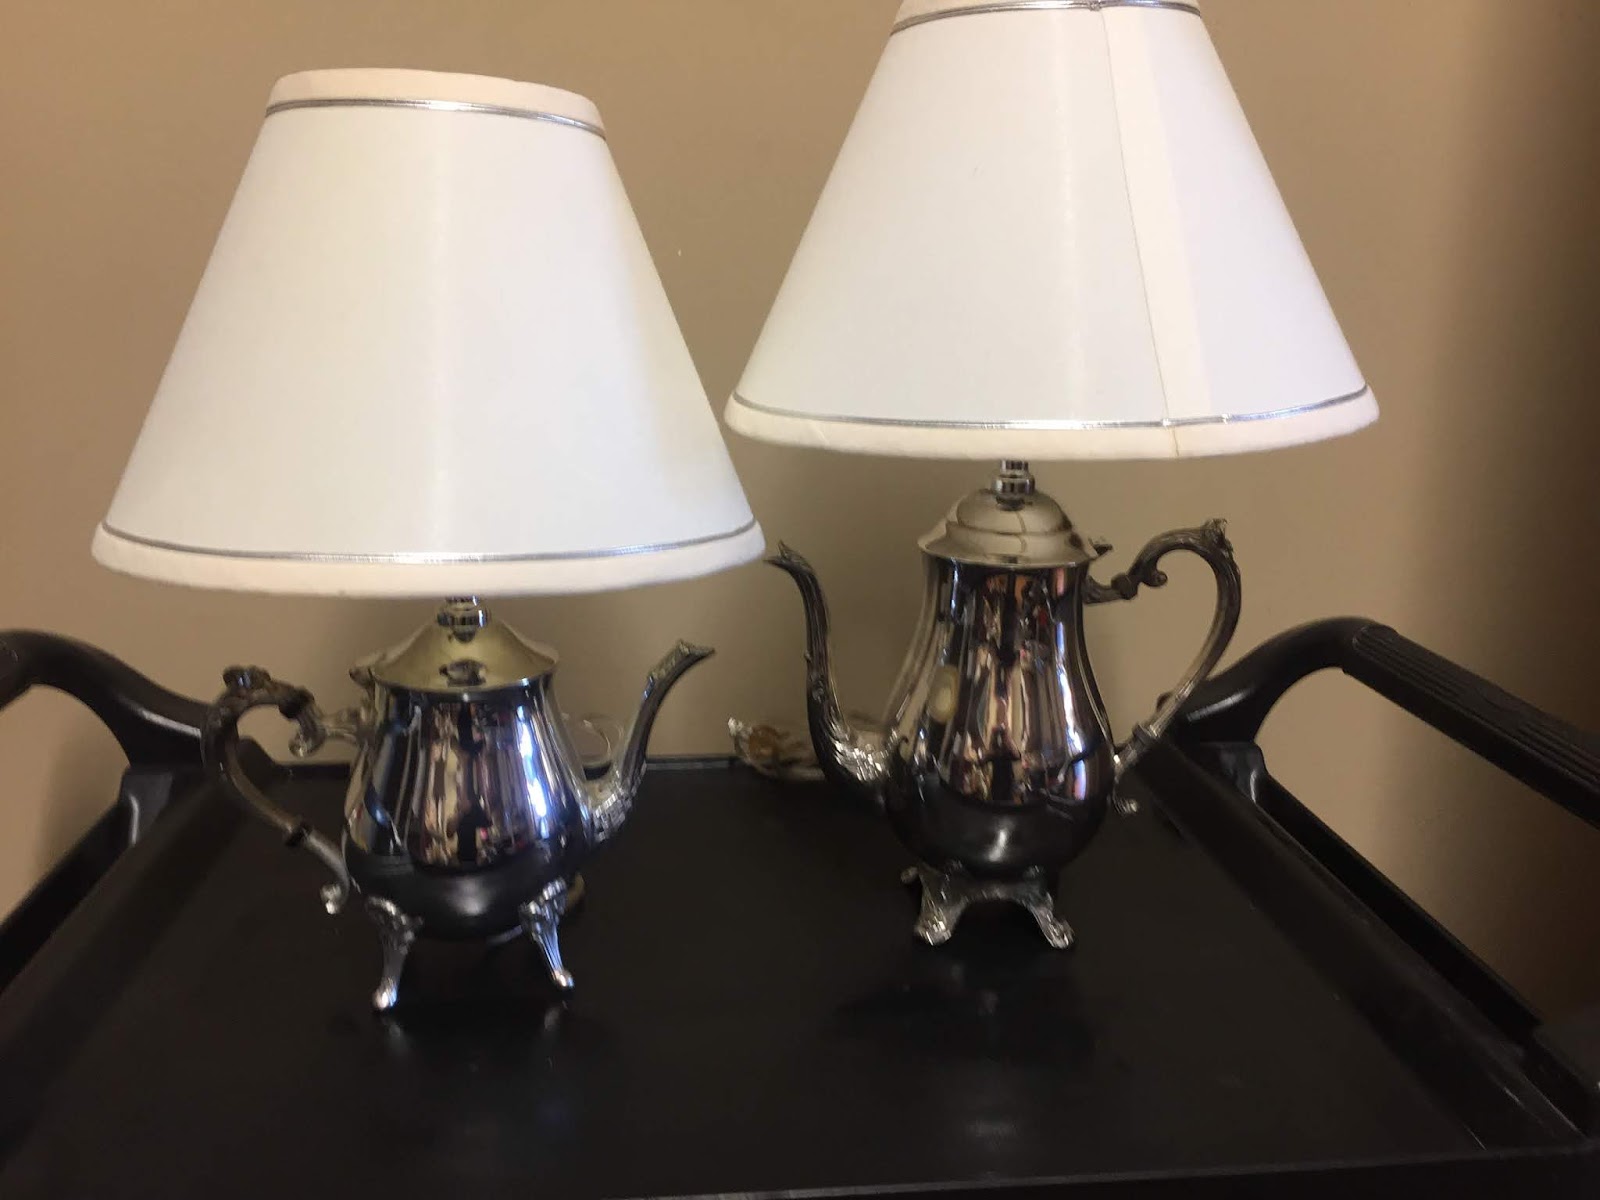
Adding a bit of light and sparkle to my life, a great thrift store find! Silver Teapot and Coffee Pot Lamps!


There is a few thrift stores I frequent where I live and each is special to me for a different reason. I often will go to the thrift store when the "spirit moves me" or when I get a few stolen moments.  I get a thrill when I find a treasure, often an inexpensive tea cup and saucer, small knick knack  and I don't often spend more than a few dollars, however it is my birthday month and well the find I got last week had me going over my thrift store budget but I think you can see why I simply had to have these and you may want to make your own! I found both a Silver coffee pot and tea pot that had been turned into lamps!!!

Other than having to polish these beauties I could not believe a reason someone would want to get rid of these treasures but I am very glad they did! At $25 each, these working lamps truly spoke to me.
With a tiny bit of silver polish and cloth I made short work and brought these beauties back to life. They are now in my bed room and the perfect bedside reading lamps. The hospital thrift store I purchased them from benefited from my purchase and whomever thought to give these a new life, certainly brightened mine.
If you would like to learn how to make your own I found this youtube video that might get you inspired to try making your own.

Thank you for joining me for a cup of tea and a great thrift store find!
I would love to hear from you so please leave me a comment here or email me at karenmowen@gmail.com

Saturday, November 17, 2018

Tea Advent Calendar Craft


I belong to a lovely Facebook Group Tea Cup Challenge Page and this year we started to do some fun tea swaps, one of the largest swaps we did was our Advent Swap. I started to think about mine in May, yes May.

I actually sewed most of it in September and finished it just before our deadline to ship of November 1st. I thought I would like to share with you how I did it and maybe inspire you to make your own. Please note I am a craft sewer and not the most patient crafter in the world so mine is a bit unique in the way the lines are not totally straight.

I used items I found at the dollar store to create my calendar base. A red and white placemat make up the base and the burlap and lace ribbon made me think I could make a beautiful calendar! The total cost of making the calendar (aside from the tea I had on hand) was under $10 Canadian.

I layered the burlap ribbon out and cut it so that it filled the placemat. I got 24 bags of tea (all different, seriously I could start my own tea room with my personal inventory) then I pinned and measured the pockets, removed the tea and then sewed straight-ish lines to create my calendar,
For a few weeks I struggled with how to number the pockets and then found these gemstone numbers at the dollar store, and I purchased three packages of them and set them in place.
I loved how easy they were to stick on and they seem to be staying!
I mailed this calendar to my partner and I hope she loves it. It was made with love and filled with tea and sent many miles and a country away. 
I hope that this inspires you to make and share a tea advent calendar with a tea lover in your life. 
Thank you for joining me for a cup of tea and a tea time craft. I would love to hear from you so please leave me a comment here or email me at karenmowen@gmail.com 

Sunday, November 4, 2018

Mug Rug Sunday...

My Aunt Margot, made me this lovely mug rug in the spring and I had it on my table yesterday. Mug rugs are wonderful little placemats not much larger than coasters or can be as large as you would like, their purpose is to give you a pretty place to put your mug or teacup and perhaps a light lovely snack.
My aunt is a quilter and hers is really special to me, it has pockets you can slip a tea bag into as well.

These are lovely gifts to make and give and fun to pick up at craft fairs. They are great for scrap busting as well. Here are some of my favorite free patterns incase you wish to make your own.

This one from love to sew.com 
This is a great tutorial and pattern idea The sewing loft blog 
Beyond Sock Monkeys has a great tutorial as well. Click here to see this very simple quilting project. 

I hope you have a lovely Sunday! Happy Sewing! Thank you for joining me for a cup of tea and a tea time craft idea. I would love to hear from you so please leave me a comment here or email me at karenmowen@gmail.com

Saturday, October 27, 2018

The Reluctant Reader And Captain Underpants

Friday the 19th was a non school day for my Reluctant Reader. With my new work schedule I was still lucky enough to have the day off. We spent the morning creating a "Captain Underpants Plush" for my Reluctant Reader.  Last year if you may remember my youngest son finally found some books to love. I call him the reluctant reader because like most boys his age, I have found, they are just not motivated to read. I remember my grandfather telling my mother that it really did not matter what they read as long as they were reading. He did not care if it was comic books or the back of the cereal box, as long as it was meaningful to them the love of reading would follow. For Alex, that I have found to be true.
It all started for us when Alex found a Captain Underpants plus online but it was sold out. We decided to make our own and we used felt, my sewing machine, trusty glue gun and a sharpie marker. I had forgotten to buy stuffing and we improvised and used toilet paper, hey it happens.
I was more than a little impressed about how well it actually turned out.
I drew out the shape of the body on a piece of regular paper and cut it out, then I cut out arms with hands. I wish I had sewing pipe cleaners into the arms but it was an after thought, next time I will.
I did not stuff the arms either, I likely should have.  I was thrilled with how easy this came together.
I used paper to create the underpants first and then cut out the felt, I measured and sewed the underpants, and then drew on the details. Once they were sewn and drawn we put them on and I secured them with a bit of hot glue.

The cape was easy to make we used two different reds one dark color for the main part of the cape and cut out circles with a lighter red and glued them on the cape. We cut out a mouth, drew on the teeth and glued that and brown eyes into place.
In the end what was once just pieces of felt became a superhero and a new best reading friend. 
Even though Alex is my youngest son, my older boys did not discover the joy of this cheeky and very well written series.
Thank you for joining me for a cup of tea and a reluctant reader craft experiment. I would love to hear from you so please leave me a comment here or email me at karenmowen@gmail.com

Monday, October 22, 2018

Witches Brew Craft Idea...

If you know me at all you know I love witches! Reading about them, writing about them, hosting witches tea parties and creating witch themed tea items, like the Witches Brew Loose Tea Potion Holder I made for myself.
I found this fun craft at Michaels the craft store and waited for my 40% off coupon. The holder was $19.99 in Canada.  I used a dollar store bottle of black acrylic paint and a foam paint brush to paint the bamboo structure. I let it dry and then I filled it with 5 of my favorite murchies loose leaf teas.
I was very happy to lend it to a young friend for her witches tea party this year as well. Looks pretty cute on her windowsill.
 Thank you for joining me today for a cup of tea and a fun witches tea time craft. Sending you love from the tea shop!
I would love to hear from you so please leave me a comment here or email me at karenmowen@gmail.com

Thursday, May 31, 2018

Personalize Your Tea Ball...

Today I am showing you a simple way to take an inexpensive tea ball and personalize it for yourself or someone you love with charms and jump rings from the craft store. This is so easy to do you won't believe it.

To make your own you will need:
-A metal tea ball with a chain
-Charms (order on Etsy, Ebay or find at your craft store)
-Jump rings (order on Etsy, Ebay or find at your craft store)
-Needle nose pliers

Step one - Assemble all your supplies.
Step two- Use your pliers to open the jump rings wide enough to slide the ring through one of the chains of the tea ball.
Step three- Slide your charm onto the jump ring and close with your needle nose pliers.
Step four- Repeat with as many charms as you would like to use.
* I chose a teapot with tea cup and a book, as it best represents my blog.
Fill your tea ball with 1 tsp of your favorite loose leaf tea...
Or package your newly embellished tea ball with some loose leaf tea, and some of your favorite cookies as a gift for a tea lover you know.

Thank you for joining me for today's Tea Time Craft. I would love to hear from you so please leave me a comment here or email me at karenmowen@gmail.com

Thursday, March 22, 2018

Tea Time Emergency Craft Anyone?

Last Saturday night I had a craft night at my place. We all brought our own crafts and had fun visiting and sharing great food while crafting. I had found earlier in the week this great idea from Craft Gossip to make a very cute tea time craft. I made mine a bit differently but I used items from the dollar store. A rescued teaspoon from the charity shop and one of my special Stash Tea Christmas teas to make this very sweet emergency tea stash.
This is the one that Craft Gossip Shared. I loved it and made some changes on mine.
You can find the craft idea and more photos by clicking here. 
Thank you for joining me today for a cup of tea and a tea time craft. I would love to hear from you so please leave me a comment here or email me at karenmowen@gmail.com

Wednesday, February 7, 2018

Tea Craft Idea- DIY Tea Journal

I have not always been a tea drinker, actually I only started drinking tea in 2009. I had a passion for teacups long before I ever even tried tea.  When I first found the courage to try teas and joined a tea bag swap with in a tea group on Swap-Bot I began saving the little tea tags so that I could make note of what I tried and then when I went to buy my own teas to enjoy I had an idea of what I liked and who made them.  Today I wanted to share this fun journal idea with you, it is inexpensive, not time consuming and a of a fun way to keep track of the teas you have enjoyed and the ones you did not.

To make your own you will need:
-A notebook
-A glue stick
-A stamp pad
-A tea themed rubber stamp (you could free hand draw or use stickers too)
-A pen
-Tea Tags

First step of course is to make yourself a cup or pot of tea. Save the tea tag by giving it a tiny tug it should come off in your hands.

Second take your rubber stamp and pad and make sure the stamp is covered with ink. Place it on your journal page and apply pressure to make sure the image transfers. You can do each page ahead of time or each time you journal up to you.

Third, Draw a line as if it was the tag hanging out of the pot or your tea mug, add some glue to the back of the tea tag and press it into place.

Fourth make some notes about the tea, who made it, what was in it, how long you steeped it, how it made you feel and what it tasted like.


I hope you have fun making your own tea journal and taking your own imaginary voyages with each cup of tea.
Thank you for joining me for a cup of tea and a cozy tea craft. I would love to hear from you so please leave me a comment here or email me at karenmowen@gmail.com
Wednesday, July 26, 2017

DIY Steampunk Fascinators Inspired by the Maddie Hatter Series written by Jayne Barnard

While reading Maddie Hatter I felt inspired to also create some Steampunk themed fascinators based on both books, Maddie Hatter and the Deadly Diamond and Maddie Hatter and The Gilded Gauge! I can not help but just love her clockwork bird who nests in her hat! I wanted to honor that little bird by making a hat of my own and I made a second one of gauges and gears inspired by book two Maddie Hatter and the Gilded Gauge. I thought it maybe fun to share how I did it so that you may make your own!

To make your own Fascinator you will need:

-Small Top Hats ( I get mine here) 
-Hair clips (I get mine at the dollar store)
-Felt that matches the color of the hat base you choose
-Hot glue gun with glue sticks
-Wire bird (I got mine at the dollar store)
-Ribbon, Lace or Tulle (I got mine at the dollar store)
-Gem stickers (I got mine at Michael's The Craft store)
-Tiny Gears ( I got mine at the craft store)
-Buttons
-Scissors
-sewing needle and tread
-Metallic Sharpie Marker


 Step 1- Assemble all your supplies. Pick the side of the hat you wish to decorate. Plug in your glue gun and get ready for some creative fun!


Step 2- Start with the placement of your bow or veil. If using tulle, cut a 10 inch piece and thread your needle and use a running stitch to go through the center of the tulle piece. As you pull the thread you should have a ribbon form as in the photo above. Use a large dab of glue from your glue gun  on the side of the hat and carefully press the ribbon into the side of your hat form.  If using a bird at this time take him out of the package and secure him to the ribbon and the hat with more glue.
Step 3- Once you have put your bird in place, decorate under him and above the brim of your hat with buttons or gears, gluing them into place.
Next use your sharpie marker to color the beak of your bird to give it a metallic look. Choose two smaller gears (They do not have to match) for the birds eyes, and attach them with a bit of hot glue.
Use small gem stickers for the eyes, gluing them on top of the gears as shown in the photos above.
If you are making one with gears and no bird you can place them as shown and secure with more glue, you can use wires or bobby pins to give the gears height as I have here and decorate with gem stickers.

Step 4- Once you are happy with how you wish you hat to look on the top, it is time to attach a hair clip to the underside of your hat as I have done with a dab of glue. I have also used a piece of felt in a matching color to secure the edge of the clip in place. Once the glue is dry you can flip it over and try it on!
These are simple easy and fun ways to bring a little Steampunk fashion inspired by Maddie Hatter into your own wardrobe.
Learn more about Maddie Hatter and this amazing series by clicking here for Author Jayne Barnard's Website. 

Thank you for joining me for a cup of tea and a cozy series inspired craft! I would love to hear from you so please leave me a comment here or email me at karenmowen@gmail.com