While reading Maddie Hatter I felt inspired to also create some Steampunk themed fascinators based on both books, Maddie Hatter and the Deadly Diamond and Maddie Hatter and The Gilded Gauge! I can not help but just love her clockwork bird who nests in her hat! I wanted to honor that little bird by making a hat of my own and I made a second one of gauges and gears inspired by book two Maddie Hatter and the Gilded Gauge. I thought it maybe fun to share how I did it so that you may make your own!
To make your own Fascinator you will need:
-Small Top Hats ( I get mine here)
-Hair clips (I get mine at the dollar store)
-Felt that matches the color of the hat base you choose
-Hot glue gun with glue sticks
-Wire bird (I got mine at the dollar store)
-Ribbon, Lace or Tulle (I got mine at the dollar store)
-Gem stickers (I got mine at Michael's The Craft store)
-Tiny Gears ( I got mine at the craft store)
-Buttons
-Scissors
-sewing needle and tread
-Metallic Sharpie Marker
Step 1- Assemble all your supplies. Pick the side of the hat you wish to decorate. Plug in your glue gun and get ready for some creative fun!
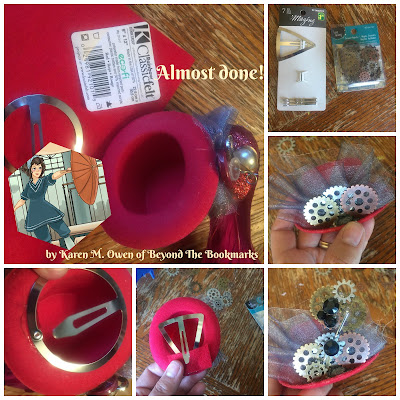
Step 2- Start with the placement of your bow or veil. If using tulle, cut a 10 inch piece and thread your needle and use a running stitch to go through the center of the tulle piece. As you pull the thread you should have a ribbon form as in the photo above. Use a large dab of glue from your glue gun on the side of the hat and carefully press the ribbon into the side of your hat form. If using a bird at this time take him out of the package and secure him to the ribbon and the hat with more glue.
Step 3- Once you have put your bird in place, decorate under him and above the brim of your hat with buttons or gears, gluing them into place.
Next use your sharpie marker to color the beak of your bird to give it a metallic look. Choose two smaller gears (They do not have to match) for the birds eyes, and attach them with a bit of hot glue.
Use small gem stickers for the eyes, gluing them on top of the gears as shown in the photos above.
If you are making one with gears and no bird you can place them as shown and secure with more glue, you can use wires or bobby pins to give the gears height as I have here and decorate with gem stickers.
Step 4- Once you are happy with how you wish you hat to look on the top, it is time to attach a hair clip to the underside of your hat as I have done with a dab of glue. I have also used a piece of felt in a matching color to secure the edge of the clip in place. Once the glue is dry you can flip it over and try it on!
These are simple easy and fun ways to bring a little Steampunk fashion inspired by Maddie Hatter into your own wardrobe.
Learn more about Maddie Hatter and this amazing series by clicking here for Author Jayne Barnard's Website.
Thank you for joining me for a cup of tea and a cozy series inspired craft! I would love to hear from you so please leave me a comment here or email me at karenmowen@gmail.com


Hi Karen & Kathi! turtle6422(at)gmail(dot)com
ReplyDelete